So I set off with the following list of requirements.
1) It must have two climbing components, a rock wall and a cargo net.
2) It must be sturdy enough to hold 3 children at once.
3) It must have a small footprint.
4) It must be portable and it must be able to collapse or fold for storage during the winter.
5) Total cost of materials must be under $400 CDN and be built using commonly accessible tools (using either what I already had on hand, or could borrow from my father - only tools that I already knew how to use).
Here is the end result:


Footprint: 7.5ft x 4ft
Height: 6ft from ground to top of the wall (6ft 3.75in to highest point)
Folded Dimensions: 7ft x 8in
Total Cost: $468.67 (ok, I didn't succeed here - but it was close!)
Tools Used: Circular saw, jigsaw, hacksaw, electric drill, power sander, various wrenches / drill bits / screw driving bits, hammer, chisel, screwdriver, pliers, metal file, tape measure, carpenter's square.
If you would like to build something similar, below you can find my complete materials list (not including the extras I had left over!), design plans, assembly instructions, and plenty of photos I took during the process. If you do decide to build your own, I would love to hear from you to see how it turned out - please leave a comment below or send me an email.
Materials
Note: I have no connection to Home Depot or any renovation stores - I just shop there. I've included links for everything I bought to their product page at the place I bought them from for your reference.
Qty
|
Material
|
Purpose
|
7
|
Structure
|
|
7
|
Climbing deck
|
|
8
|
Structure
|
|
4
|
Structure
|
|
1
|
Structure
|
|
2
|
Structure + Climbing Holds
|
|
2
|
Hinge
|
|
8
|
Hinge
|
|
2
|
Hinge
|
|
2
|
Cross brace mounting
|
|
2
|
Cross brace mounting
|
|
8
|
Cross brace mounting
|
|
4
|
Cross brace mounting
|
|
4
|
Cross brace mounting
|
|
1
|
Cross brace
|
|
5
|
Climbing Net Anchors
|
|
16
|
Climbing Net Anchors
|
|
1
|
Rock Wall
|
|
1
|
180ft
of 5/8-inch 3-strand twisted polypropylene rope (this was purchased at Rona, but I could not find their product page for it online)
|
Climbing Net
|
The basic concept for this build is a simple A-frame with a removable cross brace that allows the two faces of the frame to fold together. An off-center pivot and one face narrower than the other allows it to nest inside it when it is folded and thus letting it fold completely flat.

Instructions
These instructions include some adjustments that I made during the construction process when I noticed and made some changes during the build. You may see some pictures that seem to be out of order because more of the structure has been finished than where you are. This is because I had to go back and add some reinforcement later on to ensure it was structurally sound.
Building the Frame
The legs of the frame are constructed from four 2x6's that are cut identically. Repeat the following for each of the four 2x6 boards.
1) Drill a 3/16-inch pilot hole located 7 ft (84 inches) from one end and 1 inch off-center (3-3/4 inches from one side, 1-3/4 inches from the other).
2) Using a compass (or a piece of string tied to a screw) that is anchored at your pilot hole, mark a 3-3/4 inch radius arc across the short end of the board.
3) Cut along the arc with a jigsaw and round the end of the leg.
4) Enlarge your pilot hole with a 5/8-inch drillbit. This is where the Pivot Bolt will be eventually secured.
5) Mark a diagonal line across the long end of the board from the corner to a point 3-7/16 inches from the end on the same side that has the offset hole.
6) Cut alone the line with a circular saw.


The legs of the frame are complete (for now), the next step is to cut and attach the beams that will form the support structure for each face.
7) Using two 2x6's, mark and cut two lengths that are 45 inches long, and two lengths that are 41-1/2 inches long.
8) Select two legs to use for the larger Rock Wall side of the structure.
9) Mark and mount the two 45 inch beams flush with the leg's Face Edge. One beam will be positioned 4-1/2 inches above the toe, the tip of the bottom edge of the leg. The other beam will be positioned 3-1/2 inches below the Pivot Hole.

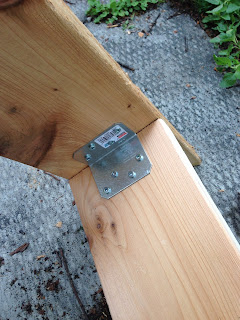
10) Attach each beam using two 4-inch wide metal reinforcing angles and 1-inch wood screws.


11) Select two legs to use for the smaller Cargo Net side of the structure.
12) Mark and mount the two 41-1/2 inch beams perpendicular to the leg's Face Edge. One beam will be positioned 6 inches above the toe, the tip of the bottom edge of the leg. The other beam will be positioned 3 inches below the Pivot Hole.

13) Attach each beam using two 4-inch wide metal reinforcing angles and 1-inch wood screws on the bottom side of the beams.


14) Take both parts of the structure and tip them onto their sides. Place them so that you line up the pivot holes and the two structures are back-to-back, the Cargo Net side should fit nicely inside the Rock Wall side.
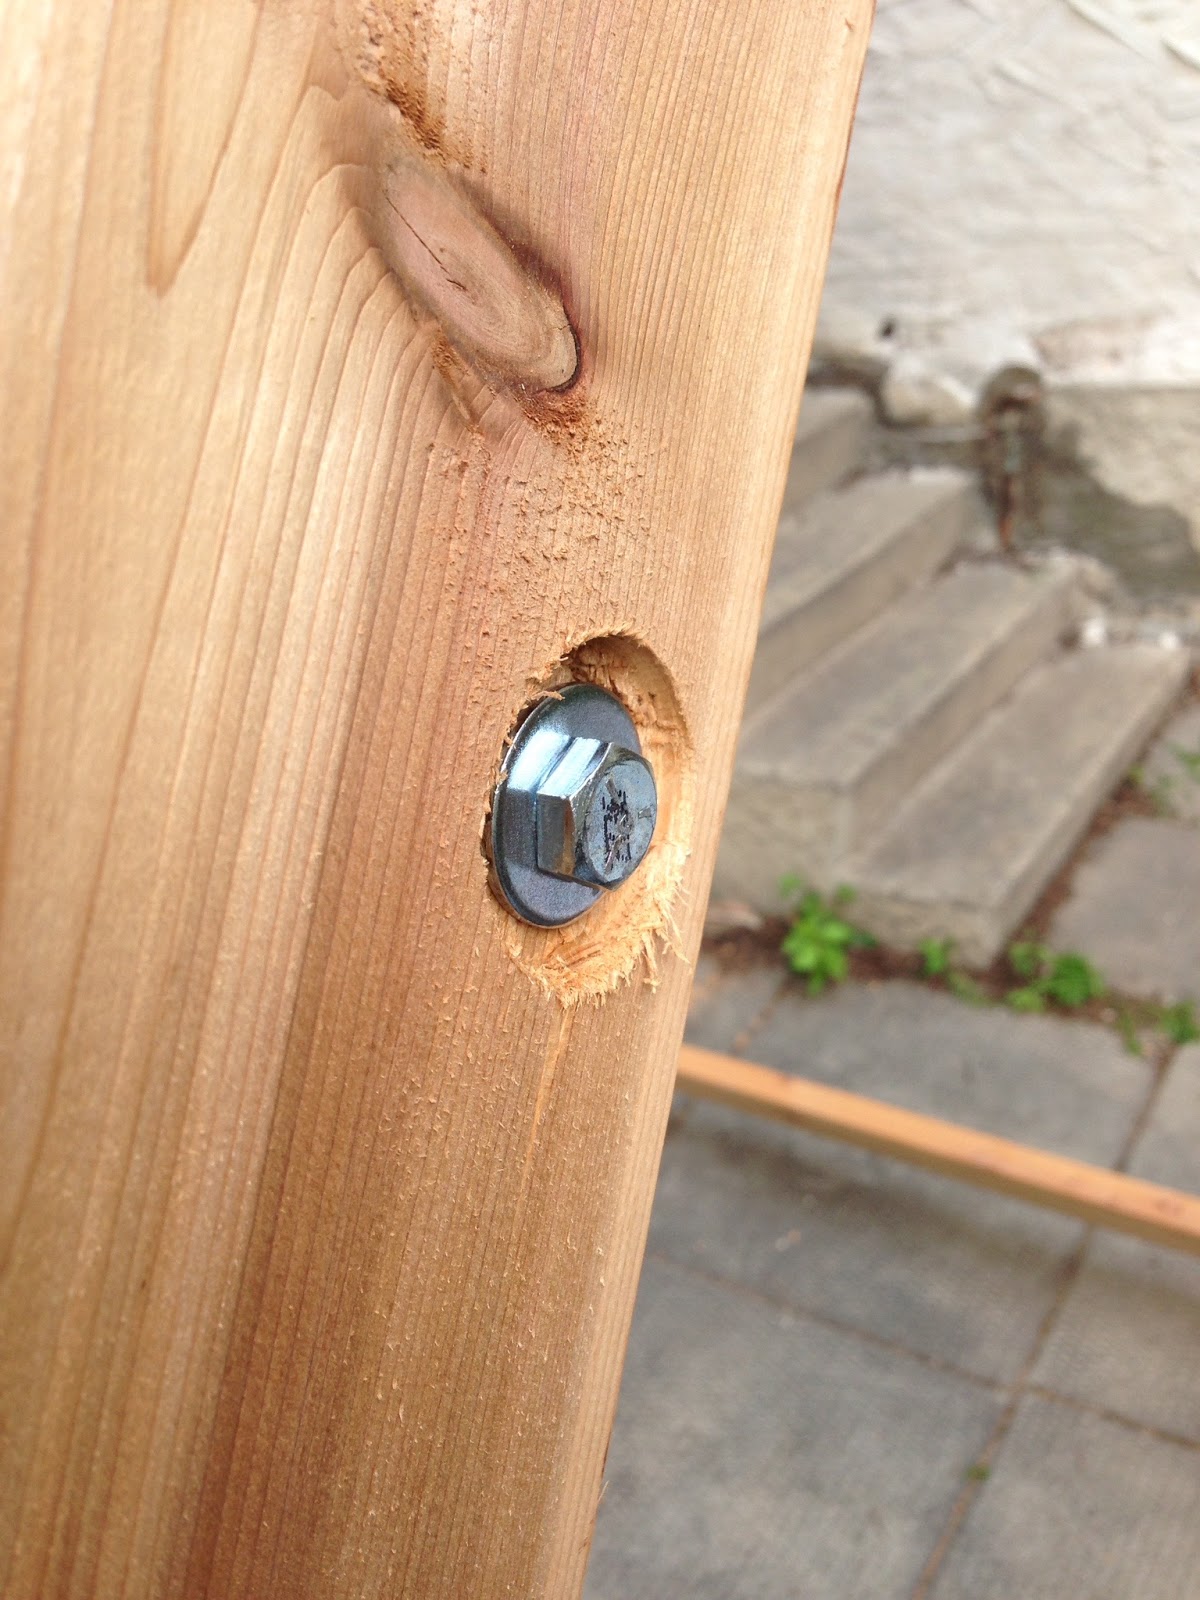
15) Through each of the pivot holes from the outside-in, thread a 1/2-inch diameter, 4-inch long hex capscrew bolt. Place one washer on the outside, two in between the two pieces of wood, and one on the inside. Use a nylon insert lock nut to hold it in place and tighten firmly.


To complete the base structure the last step is to add reinforcement to the Cargo Net side in order to support the weight of the climbers once the net is mounted to the frame.
16) Secure each beam on the Cargo Net side using two 2-inch by 3-inch metal reinforcing angles and 1-inch wood screws on the top side of the beams. Make sure to position the reinforcing angles so the 2-inch side is vertical against the legs and the 3-inch side is horizontal against the beam.
17) Using the last 2x6, mark and cut two lengths that are 41 inches long. Slide each beam on top of the reinforcing angles you just added and attach each of them with 6 3-inch wood screws up through the beam just below it to laminate them together.


Adding the Cross Brace Mounting
The cross brace is a simple removable metal bar that attaches to the legs of the structure on either side and holds them in place, preventing the structure from sliding open when it is upright. The cross brace is detachable, allowing the structure to be folded up and stored flat.
1) Using a hacksaw, cut the slotted flat metal bar in half at a slight (60-degree) angle. Use a metal file to file down the sharp cut ends of the bar.
2) Stand the structure upright so that it is in its final A-frame position. Measure to ensure the pivot bolt is 6 ft above the ground, and from the toe of the Rock Wall side to the toe of the Rope Net side is 7 ft 6 in. The feet of the structure should rest flush and level on the ground.
3) The outermost unbroken holes in the slotted metal bar are the mounting holes. The next step will be to position them on the structure and mark them so that we can drill holes for the mounting bolts.
4) Position the metal bar so that the angled cut is almost flush with the Rock Wall face and low enough so that the mounting hole on the cut side is about 1-inch from the face edge, and the mounting hole on the other side is about 1-inch from the back edge of the Cargo Net side.
4) Mark the mounting hole positions on the structure and repeat for the other side. Use a 3/8-inch drill bit to drill the four marked positions.
Because the Cargo Net side is designed to fit inside the Rock Wall side, if we simply put the mounting bolts in as-is then the cross brace wouldn't sit flush and true on both sides of the structure - it would have to bend to fit properly. Also, the mounting bolt on the Cargo Net side would interfere and prevent the structure from folding completely closed.
To solve these problems I had to add a block on the Rock Wall side for the cross brace to rest against securely, and I had to counter-sink the bolt on the Cargo Net side.
5) Using a scrap of 2x6 from previous cuts, rip two 1-1/2 inch strips lengthwise along one of your scrap pieces. Cut these strips down so they are 3-inches long. The grain of the wood must run lengthwise to avoid spitting.
6) Use a 3/8-inch drill bit to drill holes in the center of each 1-1/2x3 inch block.
7) Through each of the brace mounting holes on the Rock Wall side, from the outside-in, thread a 3/8-inch diameter, 4-inch long hex capscrew bolt. Place one washer on the outside prior to threading - you will need a hammer in order to drive the bolt through the hole (it's a tight fit). Once you have the bolt inserted, slide the wooden block that you just made onto the end (again, with a hammer).
8) Once the block is firmly in place, place a washer on the bolt and secure it in place with a 3/8-inch hex nut.


9) On the Cargo Net side, use a small coring drill bit (I used 1-1/4 inch bit) to drill 1/2-inch deep on the outside of the frame where you have already drilled the mounting hole. Use a chisel to clear and clean the center of the core.
10) Through each of the brace mounting holes on the Cargo Net side, from the outside-in, thread a 3/8-inch diameter, 2-1/2-inch long hex capscrew bolt. Place one washer on the outside prior to threading - you will need a hammer in order to drive the bolt through the hole (it's a tight fit). Place a washer on the bolt and secure it in place with a 3/8-inch hex nut.


11) Thread the cross brace on the mounting bolts and secure with two 3/8-inch steel wingnuts.


Finishing the Cargo Net
To finish the cargo net and end this project we need to install the rope anchors, weave the net with our ridiculous amount of rope, and tie it off.
1) Along the underside of the upper beam on the Cargo Net side evenly space and mark 5 points 8-1/2 inches apart along the length and 1 inch from the side's face. The beam is 41.5 inches long, so your marks will be at 3-3/4, 12-1/4, 20-3/4, 29-1/4, and 37-3/4.
2) Drill a hole slightly smaller than the threading on your 7/8-inch eyebolt. For the eyebolts I bought, I used a 5/16-inch drillbit and drilled 1-1/2 inches deep leaving enough wood for the screw to bite without splitting the beam.
3) Screw your 7/8-inch eyebolts into the drilled holes and align them so they are flush with the face.


4) Mark 8 points down each leg, 1-inch from the face, starting 4-1/4-inches from the top beam and then spaced 8-1/2-inches apart. Drill each mark and install your 5/8-inch eyebolts in the same fashion. Align the eyebolts so they are perpendicular to the face this time.
The screw length of the 5/8-inch eyebolts is shorter and thinner than the 7/8-inch eyebolts so make sure you select an appropriate drill bit, and don't drill as far into the leg. I used a 3/16-inch drillbit and only drilled 1/2 to 3/4 of an inch deep.


5) Cut your rope into 10 equal lengths of 18 feet, using a lighter to melt the ends to prevent fraying. If you are left with one rope slightly shorter than the others when you reach the end of the roll that's ok. Set that rope aside and use it for one of the outside edges of the Cargo Net - the side strands have fewer knots and don't need to be quite as long.
6) Group your ropes into 5 pairs, tie a secure knot at one end and thread the two long ends through one of the five eyebolts at the top of the frame from the back.
7) Here I will cheat. I will send you a link to how to tie a cargo net. My wife did the knotting (and did a fantastic job of it too!) because I can't tie knots to save my life.
Ignore their advice for rope length or net size - only worry about the knot structure and pattern. This net is made using a 6-inch grid and the eyebolts are spaced properly for that size.
How to Make Rope Climbing Nets
Every other row of knots, the outside strands remain loose. Thread them through the eyebolts to anchor them.


8) When you reach the bottom, drill five 1-inch holes spaced in the same way as the eyebolts at the top of the frame.
9) Tie one last row of knots, then thread each pair of ropes through the holes and tie them off on the other side. ***
***Caveat - I didn't get to do this. I used 150ft of rope, not 180ft - and we came up a little short. I had to improvise using a heavy metal plate and screwing the ropes into place on the underside of the frame. It was my plan to tie them off, but it didn't quite work out.
And you are done! I hope you have fun with these instructions, and if you give it a try please let me know how it works for you!
The structure would consist of two mirrored A-frames as shown above, built from solid cedar 2x6's. The frames would be connected by 2x6 beams so that the 'exterior' legs are on the same face and that the completed structure is 4ft wide and a 1/2" hex bolt at the top center serves as a pivot so that the two halves can close like a scissor.
The Rock Wall face will be decked with 1x6 cedar boards for the climbing holds to be mounted on, while the Cargo Net face will have ropes woven together through eyebolt anchors that have been drilled into the frame.
Instructions
These instructions include some adjustments that I made during the construction process when I noticed and made some changes during the build. You may see some pictures that seem to be out of order because more of the structure has been finished than where you are. This is because I had to go back and add some reinforcement later on to ensure it was structurally sound.
Building the Frame
The legs of the frame are constructed from four 2x6's that are cut identically. Repeat the following for each of the four 2x6 boards.
1) Drill a 3/16-inch pilot hole located 7 ft (84 inches) from one end and 1 inch off-center (3-3/4 inches from one side, 1-3/4 inches from the other).
2) Using a compass (or a piece of string tied to a screw) that is anchored at your pilot hole, mark a 3-3/4 inch radius arc across the short end of the board.
3) Cut along the arc with a jigsaw and round the end of the leg.
4) Enlarge your pilot hole with a 5/8-inch drillbit. This is where the Pivot Bolt will be eventually secured.
5) Mark a diagonal line across the long end of the board from the corner to a point 3-7/16 inches from the end on the same side that has the offset hole.
6) Cut alone the line with a circular saw.


The legs of the frame are complete (for now), the next step is to cut and attach the beams that will form the support structure for each face.
7) Using two 2x6's, mark and cut two lengths that are 45 inches long, and two lengths that are 41-1/2 inches long.
8) Select two legs to use for the larger Rock Wall side of the structure.
9) Mark and mount the two 45 inch beams flush with the leg's Face Edge. One beam will be positioned 4-1/2 inches above the toe, the tip of the bottom edge of the leg. The other beam will be positioned 3-1/2 inches below the Pivot Hole.
10) Attach each beam using two 4-inch wide metal reinforcing angles and 1-inch wood screws.


12) Mark and mount the two 41-1/2 inch beams perpendicular to the leg's Face Edge. One beam will be positioned 6 inches above the toe, the tip of the bottom edge of the leg. The other beam will be positioned 3 inches below the Pivot Hole.
13) Attach each beam using two 4-inch wide metal reinforcing angles and 1-inch wood screws on the bottom side of the beams.


14) Take both parts of the structure and tip them onto their sides. Place them so that you line up the pivot holes and the two structures are back-to-back, the Cargo Net side should fit nicely inside the Rock Wall side.
15) Through each of the pivot holes from the outside-in, thread a 1/2-inch diameter, 4-inch long hex capscrew bolt. Place one washer on the outside, two in between the two pieces of wood, and one on the inside. Use a nylon insert lock nut to hold it in place and tighten firmly.


To complete the base structure the last step is to add reinforcement to the Cargo Net side in order to support the weight of the climbers once the net is mounted to the frame.
16) Secure each beam on the Cargo Net side using two 2-inch by 3-inch metal reinforcing angles and 1-inch wood screws on the top side of the beams. Make sure to position the reinforcing angles so the 2-inch side is vertical against the legs and the 3-inch side is horizontal against the beam.
17) Using the last 2x6, mark and cut two lengths that are 41 inches long. Slide each beam on top of the reinforcing angles you just added and attach each of them with 6 3-inch wood screws up through the beam just below it to laminate them together.


Adding the Cross Brace Mounting
The cross brace is a simple removable metal bar that attaches to the legs of the structure on either side and holds them in place, preventing the structure from sliding open when it is upright. The cross brace is detachable, allowing the structure to be folded up and stored flat.
1) Using a hacksaw, cut the slotted flat metal bar in half at a slight (60-degree) angle. Use a metal file to file down the sharp cut ends of the bar.
2) Stand the structure upright so that it is in its final A-frame position. Measure to ensure the pivot bolt is 6 ft above the ground, and from the toe of the Rock Wall side to the toe of the Rope Net side is 7 ft 6 in. The feet of the structure should rest flush and level on the ground.
3) The outermost unbroken holes in the slotted metal bar are the mounting holes. The next step will be to position them on the structure and mark them so that we can drill holes for the mounting bolts.
4) Position the metal bar so that the angled cut is almost flush with the Rock Wall face and low enough so that the mounting hole on the cut side is about 1-inch from the face edge, and the mounting hole on the other side is about 1-inch from the back edge of the Cargo Net side.
4) Mark the mounting hole positions on the structure and repeat for the other side. Use a 3/8-inch drill bit to drill the four marked positions.
Because the Cargo Net side is designed to fit inside the Rock Wall side, if we simply put the mounting bolts in as-is then the cross brace wouldn't sit flush and true on both sides of the structure - it would have to bend to fit properly. Also, the mounting bolt on the Cargo Net side would interfere and prevent the structure from folding completely closed.
To solve these problems I had to add a block on the Rock Wall side for the cross brace to rest against securely, and I had to counter-sink the bolt on the Cargo Net side.
5) Using a scrap of 2x6 from previous cuts, rip two 1-1/2 inch strips lengthwise along one of your scrap pieces. Cut these strips down so they are 3-inches long. The grain of the wood must run lengthwise to avoid spitting.
6) Use a 3/8-inch drill bit to drill holes in the center of each 1-1/2x3 inch block.
7) Through each of the brace mounting holes on the Rock Wall side, from the outside-in, thread a 3/8-inch diameter, 4-inch long hex capscrew bolt. Place one washer on the outside prior to threading - you will need a hammer in order to drive the bolt through the hole (it's a tight fit). Once you have the bolt inserted, slide the wooden block that you just made onto the end (again, with a hammer).
8) Once the block is firmly in place, place a washer on the bolt and secure it in place with a 3/8-inch hex nut.


9) On the Cargo Net side, use a small coring drill bit (I used 1-1/4 inch bit) to drill 1/2-inch deep on the outside of the frame where you have already drilled the mounting hole. Use a chisel to clear and clean the center of the core.
10) Through each of the brace mounting holes on the Cargo Net side, from the outside-in, thread a 3/8-inch diameter, 2-1/2-inch long hex capscrew bolt. Place one washer on the outside prior to threading - you will need a hammer in order to drive the bolt through the hole (it's a tight fit). Place a washer on the bolt and secure it in place with a 3/8-inch hex nut.


11) Thread the cross brace on the mounting bolts and secure with two 3/8-inch steel wingnuts.


The cross bracing is now complete.
Finishing the Rock Wall
To finish the Rock Wall we will need to install the climbing deck and then add the holds!
1) Measure and cut each of your seven 1x6's in half so that you have fourteen 4ft long 1x6 boards.
2) Remove the cross braces from you structure and fold it up, laying it flat on the ground with the Rock Wall side facing up.
3) Align the first of your 1x6 boards so that it is flush with the top of the top support beam on the Rock Wall side and lies across the face. Secure in place using 3-inch wood screws.
4) Position and secure the rest of the 1x6 boards on the face of the Rock Wall side, leaving a small, 1/4-inch gap between them (I used a couple of small screws as spacers to keep it consistent).


5) Arrange the climbing holds on the Rock Wall surface however you like and screw them in place.
A couple notes on how I arranged the holds. I avoided placing any on the bottom or top boards on the wall since they would be wasted there, at the bottom a climber can stand on the ground to reach, and at the top they can grab the top of the wall.
I also substituted a lot of the provided 2-inch screws provided for the installation of the climbing holds with 1-inch wood screws. The reason is that many of the mounting holes in the climbing holds are very shallow, and in a lot of places the 2-inch screws would punch right through the climbing deck - leaving a sharp point on the reverse side that a child could scratch themselves on. So I swapped out close to 2/3rds of the provided screws, and only used the longer ones for mounting holes that had enough rock that they wouldn't sink right through the deck.

To finish the cargo net and end this project we need to install the rope anchors, weave the net with our ridiculous amount of rope, and tie it off.
1) Along the underside of the upper beam on the Cargo Net side evenly space and mark 5 points 8-1/2 inches apart along the length and 1 inch from the side's face. The beam is 41.5 inches long, so your marks will be at 3-3/4, 12-1/4, 20-3/4, 29-1/4, and 37-3/4.
2) Drill a hole slightly smaller than the threading on your 7/8-inch eyebolt. For the eyebolts I bought, I used a 5/16-inch drillbit and drilled 1-1/2 inches deep leaving enough wood for the screw to bite without splitting the beam.
3) Screw your 7/8-inch eyebolts into the drilled holes and align them so they are flush with the face.


4) Mark 8 points down each leg, 1-inch from the face, starting 4-1/4-inches from the top beam and then spaced 8-1/2-inches apart. Drill each mark and install your 5/8-inch eyebolts in the same fashion. Align the eyebolts so they are perpendicular to the face this time.
The screw length of the 5/8-inch eyebolts is shorter and thinner than the 7/8-inch eyebolts so make sure you select an appropriate drill bit, and don't drill as far into the leg. I used a 3/16-inch drillbit and only drilled 1/2 to 3/4 of an inch deep.


6) Group your ropes into 5 pairs, tie a secure knot at one end and thread the two long ends through one of the five eyebolts at the top of the frame from the back.
7) Here I will cheat. I will send you a link to how to tie a cargo net. My wife did the knotting (and did a fantastic job of it too!) because I can't tie knots to save my life.
Ignore their advice for rope length or net size - only worry about the knot structure and pattern. This net is made using a 6-inch grid and the eyebolts are spaced properly for that size.
How to Make Rope Climbing Nets
Every other row of knots, the outside strands remain loose. Thread them through the eyebolts to anchor them.


8) When you reach the bottom, drill five 1-inch holes spaced in the same way as the eyebolts at the top of the frame.
9) Tie one last row of knots, then thread each pair of ropes through the holes and tie them off on the other side. ***
***Caveat - I didn't get to do this. I used 150ft of rope, not 180ft - and we came up a little short. I had to improvise using a heavy metal plate and screwing the ropes into place on the underside of the frame. It was my plan to tie them off, but it didn't quite work out.
And you are done! I hope you have fun with these instructions, and if you give it a try please let me know how it works for you!